Showing posts sorted by relevance for query myscrapchick. Sort by date Show all posts

Sunday, February 19, 2017

Ice Skating Bears

We are having a marvelous February thaw, but I'm sure Mother Nature has plenty more winter weather in store for us here in the U.P. of Michigan. Today I am sharing an ice skate decoration using files from My Scrap Chick.


For this project I used the "3D Ice Skate" file and " Ice Skating Bears."

Ice Skating Bears3D Ice Skate: click to enlarge

https://www.myscrapchick.com/product.cfm?product=877

https://www.myscrapchick.com/product.cfm?product=588


Let's start with the skate.

Materials

Sturdy cardstock in white, gray and black
2 feet of ribbon or cord
lace and bead decoration
1 1/2 inch wide eyelet lace
Burlap and lace trim
large eyelets
Glue and tape runner
Paper clips

1. Cut out all your pieces. I know it looks like a lot of pieces, but a great tutorial is included in your download, so follow the tutorial and take your time.


2. I added large eyelets to the lace area, but this is optional. 


3. Follow the tutorial to complete the skate. I use a combination of adhesive runner and glue. (The adhesive holds things together while the glue dries.) I also use paper clips to help hold things together while the glue dries.


4. When the skate is complete, lace up the front with ribbon or cord, then glue the tongue in place. Glue the lace and bead trim to the side.


5. Wrap the eyelet lace around the top of the skate and glue the overlap in the back. Wrap the burlap and lace trim around the top of the skate covering the top of the eyelet lace and glue in the back. 

Now we will work on the flowers and Ice Skating Bears. 

Materials

4 flower sprigs - 2 blue/purple and 2 white (I got mine from the Dollar Store.)
Round floral foam (I got mine from the Dollar Store.)
Snowflake stickers - 1/2 inch to 1 inch
 Wire that is sturdy enough to support the snowmen
Cardstock in purple, green and aqua
Patterned cardstock scraps
White glitter cardstock by Recollections
Double stick tape and glue
Paperclips


1. The bears are made from glitter cardstock and are about 3 1/2 inches tall. I duplicated each bear pattern and reversed it horizontally so there would be a bear to use for a back on each one. The hats and scarves are made using patterned cardstock scraps.


2. Put the bear front together then turn it over. Cut a 12 inch piece of wire and attach it to the back using double stick tape. Construct the back image of the bear on top lining up the pieces. Paperclip together while the glue dries. Repeat this for each bear. Make snowflake sprigs by putting two same sized snowflakes back to back sandwiching the wire in between.


3. I bought a round piece of floral foam from the Dollar Store and put it inside the skate wedging it in place with pieces of tagboard. I pulled the flowers apart into separate wire sprigs. These were arranged into the bouquet and the bears and snowflakes were added between the flowers. 

I hope you enjoyed this project tutorial. If you did, I'd love to hear from you. Have a great day! ~ Shirley


Friday, August 10, 2018

Blooming Layers Easel Card


Hi! Today I am sharing a card I made using one of my favorite My Scrap Chick files, "Blooming Layers Easel Card." You can find it here:   https://www.myscrapchick.com//product.cfm?product=1929

Blooming Layers Easel Card: click to enlarge

The prints I used for the flower are from the Samantha Rose Stack by DCWV. The solid cardstock I used was from Recollections. I used foam tape between the layers to give the flower dimension. 

The leaf sprigs are from the Apple Blossom file that was a freebie a while back. You can find it here:
  https://www.myscrapchick.com//product.cfm?product=2174

Apple Blossom: click to enlarge

I added some pre-made paper flowers, a pre-made butterfly, a sentiment I created in Design Space and I was finished. It makes for an easy, beautiful card. 


Check back tomorrow to see what else I add to this card to make it even more special.

Thanks for stopping by! Have a great day! 

Shirley


Friday, February 3, 2017

Ice Skating Bear Snowflake card


We are expecting a snowstorm so I guess winter isn't over yet. After all, the groundhog did see his shadow!
Today for my first post for My Scrap Chick, I made a quick little winter card using "Ice Skating Bears"  and " Gentle Snowflake Card." 


Gentle Snowflake Card: click to enlargeIce Skating Bears: click to enlarge

 https://www.myscrapchick.com/cw4/images/product_expanded/iceskatebears.jpg


https://www.myscrapchick.com/cw4/images/product_expanded/GentleSnowflakeCard.jpg


Materials List

Cardstock from Recollections in two shades of purple
"Purple Flower" print cardstock from Core'dinations
Glitter Cardstock in light purple and white from Recollections
Plaid, aqua, black, gray and pink cardstock scraps
small purple gems
foam tape and adhesive


I made two copies of the card base, one in dark purple and one in light purple. I layered the dark one inside the light one to give the two toned effect.  The snowflake was cut from  "Purple Flower" by Core'dinations, then I traced it on purple glitter paper by Recollections and cut it out. The two snowflakes were layered one on top of the other, then mounted onto the card base with foam tape. Tiny snowflakes were punched out with a punch. Small purple gems were added to some of the snowflakes. 


The Ice Skating Bear was cut from white glitter paper at  3 inches. The scarf was cut from a plaid scrap and the hat brim and skates were cut from an aqua blue scrap. The different layers were attached with foam tape to add dimension. 

I hope you liked my little card. If you did, I'd love to hear from you.
                                               Shirley
Saturday, February 25, 2017

March Planner Pages


I think I have caught the planner bug! Today I would like to share my March planner pages using files from My Scrap Chick.


My Scrap Chick Files Used

DIY Planner Pockets Horizontal
DIY Planner Markers
Lucky Rainbow Bears
Four Leaf Clover Trio


For the border on the left side of the first page I used the sign from 
"Lucky Rainbow Bears." The sign is 2 3/4 inches tall. I used  the "DIY Planner Bookmark" file and my Cricut Explore to create a shopping list. 


The second page was created using the "DIY Planner Pockets Horizontal" file. I used the sun and cloud and the bear with wagon from "Lucky Rainbow Bears" to accent the planner pocket page. The bear is 3 1/2 inches tall and the sun and cloud are about 2 1/2 by 3 3/4 inches. I added a 6 1/2 inch long border to the top and bottom of the page using "4 Leaf Clover Trio." I also added a "Coupons" label to the pocket.

Other Products Used

Embossed Brights by Craft Smith
Colored Cardstock from Recollections
Printed Cardstock from my scrap stash
Stickers from Making Memories

Here are pictures of the My Scrap Chick files used.   
  
DIY Planner BookmarksLucky Rainbow Bears: click to enlarge                                      4 Leaf Clover Trio: click to enlarge                                  DIY Planner Pockets Horizontal: click to enlarge
   They can be found here:  https://www.myscrapchick.com/productlist.cfm?category=109
and here: https://www.myscrapchick.com/productlist.cfm?category=74

Monday, February 11, 2019

Sweet Geisha Charlie


Hi! Today I'm on the LBBS blog with a 3-d layered card using "Sweet Geisha Charlie" from Little Blue Button Stamps and the "Vintage Card With Oval Frame" file from My Scrap Chick.


You can find Sweet Geisha Charlie here:
https://lbbstamps.com/product/sweet-geisha-charlie-digital-stamp-for-cardmaking/


Cardstock Used

Flowered print, BELLA FLORA Stack by Craft Smith
Pink Dots by Bazzil
Pink Cardstock by Craft Smith
Black Cardstock by Recollections
Light pink, yellow and green cardstock scraps.

Other Materials

Foam tape
Green gems
glue

I colored the image with Prismacolor Pencils.

Color Palette

Skin: Henna 1031, Peach 939, Light Peach 927, Yellow Ochre 942,  Cream 914, Blush Rose 928

Hair: Black, Cool Grey 90%, Coll Grey 70%, Cool Grey 50%,      Peacock Blue, Light Aqua

Dress: Kelp Green 1090, Lime Peel 1005, Pale Sage 1089


Here are the My Scrap Chick files I used.


Vintage Card with Oval Frame: click to enlarge                                               Apple Blossom: click to enlarge         


You can find the files here:
  https://www.myscrapchick.com//product.cfm?product=2153 and here:
https://www.myscrapchick.com//product.cfm?product=2174                  


Using foam tape between the top three layers, I put the card together as shown.


I added apple blossoms from the "Apple Blossom" file from My Scrap Chick to the top left side of the frame. I shaped them slightly with my fingers and added a green gem to the center of each flower.

I very happy with the way this card turned out. 
Thanks for stopping by! 


Sunday, July 12, 2020

Pinwheel Wreath


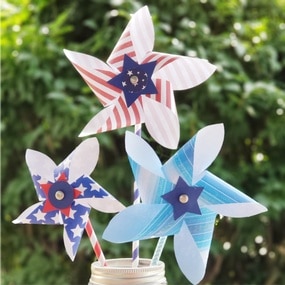
Hi! It's been awhile since I have shared a papercraft project with you. Today I am sharing this beautiful pinwheel wreath. I used Pinwheel Star from My Scrap Chick for this wreath.


MATERIALS

14 inch green flocked Styrofoam wreath
double sided paper (I used Modern Millinery Signature Paper by COLORBOK)
1 inch  and 5/8 inch circle punches (optional)
large brad fasteners
hot glue
2 feet of 3/4 inch ribbon for a hanger (optional)

     I used a 14 inch green flocked Styrofoam wreath from my crafting stash as the base for my wreath. You can use a smaller wreath and use fewer pinwheels if you desire. If you use a plain Styrofoam wreath I would wrap the wreath with 6 feet of ribbon.

     I made approximately 50 pinwheels ranging from 5 inches, to 3.5 inches, to 2.5 inches. (A different wreath base will require a different number of pinwheels.) I used 6 different papers alternating which side faced out. I used a 1 inch circle in the center of the large and medium pinwheels and a small circle in the center of the smaller ones. (You could also use the stars from the file.) The pinwheels are secured in the centers with larger brad fasteners.

    If you want a ribbon for hanging the wreath tie it around the wreath and tie a knot. Leave about six inches, tie another knot, then tie the remaining ribbon into a bow.

 I started with the largest pinwheels, evenly spacing them and alternating their positions and patterns around the wreath. Then I added the medium sized pinwheels, ending with the smallest pinwheels to fill in any empty spaces. I nestled them close together because I didn't want a lot of the base to show.


Here it is hanging on the inside of our front door. Sorry the picture isn't very good.


It may look like this wreath is an awful lot of work, but it actually was quite quick and easy to make. Give one a try!

Thanks for stopping by.

Shirley

Sunday, May 26, 2019

Beach Play Sophie Easel Card


Hi! Now that summer has finally arrived there's nothing better than a day on the beach playing in the sand!


Today I am on the Little Blue Button Stamps Blog with this fun little easel card. I used  "Beach Play Sophie" which can be found here:  https://lbbstamps.com/product/beach-play-sophie-digi-stamp/


The card base is "Bright Side Easel Card" from My Scrap Chick which you can find here:  https://www.myscrapchick.com//product.cfm?product=779

Bright Side Easel Card: click to enlarge


I made the card slightly larger at about 5 by 7 inches. Using Design Space I attached the image to the cloud and printed it using the print then cut function. I colored her using my Spectum Noir Alcohol Markers. 


The sentiment is from Digital Delights by Louby Loo. The final touch  was a row of white lace and blue striped ribbon added to the card base.


Thanks for stopping by!


Tuesday, July 14, 2020

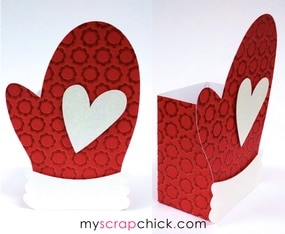
Mitten Box


It''s Christmas in July!


Today I am sharing a Christmas Mitten Box from My Scrap Chick. 


MATERIALS

 Mitten Box  pattern from My Scrap Chick
Old World Winter Stack from the Paper Studio
8 inches of ivory flower trim
5 inches of .5 inch Christmas ribbon
small red gems
3 small flowers
craft glue and glue dots
6 inches of red/white twine


I used the Old World Winter Stack from the Paper Studio for my box. I enlarged the file to 11.5 inches.


 I added ivory trim to the top and bottom of the mitten band. Then a strip of Christmas ribbon was added across the middle of the band. Red gems were added around the mitten and the heart. The heart was added to the center of the mitten, then a sentiment cut from one of the papers was added to the bottom left of the heart. A twine bow was attached to the right side of the heart with a small glue dot. Two gold flowers were added to the top of the heart with large glue dots and an ivory flower was added to the center of the mitten band.

This box would be great for all those Christmas goodies.

Merry Christmas in July!

Shirley