Showing posts with label paper piecing. Show all posts

Tuesday, March 5, 2019

Boy's Onesie Gift Box Set


A dear friend of mine recently gave birth to a sweet little baby boy and I knew that I had to make her this adorable gift box and card set.


I used Onesie Gift Box-Boy for the gift box and Onesie Overalls Flat Fold Card for the gift card. Both files are from My Scrap Chick.

Onesie Gift Box Boy : click to enlargeOnesie Overalls Flat Fold Card: click to enlarge          

 The box was sized so it fit on a 24 inch mat. I used tagboard for the box and the Nursery Rhyme Glitter Stack from Debbie Munn for the prints.The green dotted glitter cardstock is from Uptown Flair by the Paper Studio. I used real buttons as accents.
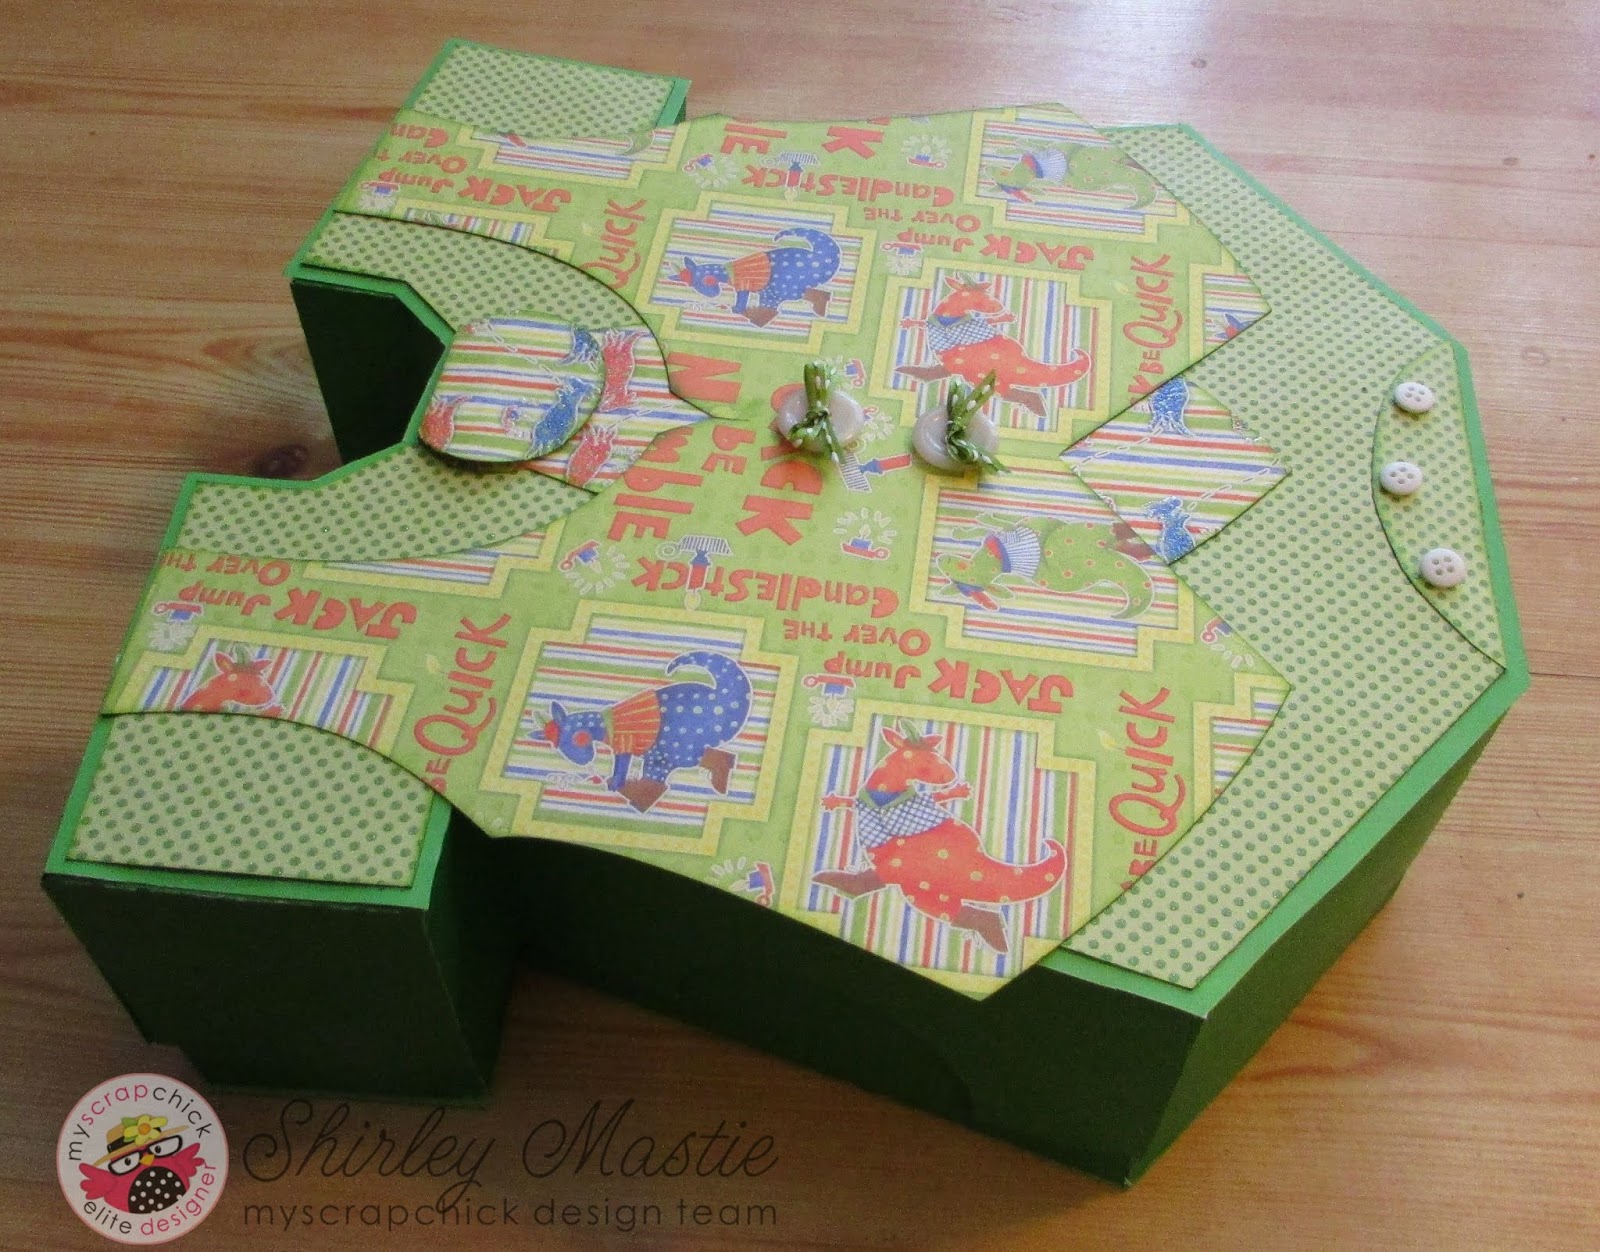
        

For the card I used Stampin Up Cardstock for the card base and the same cardstock stacks as for the box.  Again I used real buttons for accents.


I hope you liked my little boy gift box set. 
Thanks for stopping by.

Shirley

Thursday, November 29, 2018

Snowflake Ornament


Hi! Today I am sharing an ornament I made using a tag and a snowflake from My Scrap Chick.

I used my ornaments on our Christmas tree, but you could use them for package decorations or in your windows.

Here are the images I used.
Ornament Gift Tag: click to enlargeSnowflake Layers: click to enlarge          


MATERIALS

Snowflake Layers  and Ornament Gift Tag from My Scrap Chick
Dark red cardstock (Recollections)
Glossy white cardstock ( Stampin Up)
Silver pearlescent cardstock (Recollections)
Foam tape and dots
Zig fine tip glue pen and liquid glue
Red gems
Silver ribbon

Each ornament is five inches tall with a 2 3/4 inch snowflake in the middle. Each ornament is assembled on a 2 inch pentagon. For each ornament you will need five tags, a total of ten white decorative layers and one snowflake, along with the pentagon. 


Fold the ornaments in half and add a white filigree layer to the outside and inside of each ornament. I used the fine tipped Zig glue pen for this.


Glue  the ornaments to each side of the pentagon with about 3/8 inch overlapping  as shown.


Assemble and attach the snowflake to the center using foam tape. Add a red gem to the center of the snowflake.


Separate the layers to give the ornament dimension. Use small foam dots up near the fold if need be. Use a foam dot between the layers at the  tip to hold that section closed. Run a hanging ribbon through.


I love how these ornaments turned out! Why not give them a try. 
Thanks for stopping by. I'd love to hear what you think.

Happy holiday crafting! 

Shirley

Saturday, August 11, 2018

I'd Pick You

Hi! today I am sharing how I added a little something extra to the super cute  Blooming Flower Easel Card that I shared yesterday. I started with this:


and ended up with this.


I added the adorable digi image Sofie With Flower from Little Blue Button Stamps and colored her with my Spectrum Noir Alcohol Markers. I added a few extra purple flowers to tie in to the purple flower that Sofie holds.


COLOR PALETTE

Skin: FS1, 2, 3, 8, RB2, PP2
Hair: CR10, 11, DR 5, 7, EB 3, 6
Dress: CG 1 2 3, DG 1, 2, LG 1
Flower #1: BT 1, 2, HB1, 2, 3, LV 3
Flower #2 TB 1, BT1, 2, 4, GT 3


I hope you like my card. Thanks for stopping by!

Have a wonderful crafty day!


Friday, August 10, 2018

Blooming Layers Easel Card


Hi! Today I am sharing a card I made using one of my favorite My Scrap Chick files, "Blooming Layers Easel Card." You can find it here:   https://www.myscrapchick.com//product.cfm?product=1929

Blooming Layers Easel Card: click to enlarge

The prints I used for the flower are from the Samantha Rose Stack by DCWV. The solid cardstock I used was from Recollections. I used foam tape between the layers to give the flower dimension. 

The leaf sprigs are from the Apple Blossom file that was a freebie a while back. You can find it here:
  https://www.myscrapchick.com//product.cfm?product=2174

Apple Blossom: click to enlarge

I added some pre-made paper flowers, a pre-made butterfly, a sentiment I created in Design Space and I was finished. It makes for an easy, beautiful card. 


Check back tomorrow to see what else I add to this card to make it even more special.

Thanks for stopping by! Have a great day! 

Shirley


Friday, June 22, 2018

Americana Bouquet


I love anything Americana.


Today I am sharing this Uncle Sam Bouquet using  the Uncle Sam Hat Box and the Gerbera Daisy from Daisy Flowers-4 Set by My Scrap Chick.


                                           Uncle Sam Hat Box: click to enlarge                                                              Daisy Flowers - 4 Set: click to enlarge                


I made the outer portion of the Uncle Sam Hat Box to use as a vase for my bouquet. I enlarged the hat so it stands 5 3/4 inches tall.  I made the box from tagboard for stability, and made the rest of the hat using Glitter cardstock by Colorbok.  I added a 4th of July spray and four 11 inch flags to the Uncle Sam Hat Box, then added the flower stem in around them.


 I made the flowers from Americana prints from Vintage Nation Stack by the Paper Studio, Americana from Colorbok and Starry Day from Over the Moon Press. I used a shaping tool to add shape and dimension to the flowers and leaves. I glued the flowers to a multi pronged silk flower stem with the flowers and leaves removed.


I curled the ends of the petals between my thumb and first finger.


I assembled the flowers alternating the alignment of the layers and shaping the middle of the flowers.  I added a gem to the center of each flower.


I shaped the leaves in a similar fashion.


The flowers, leaves and stems were attached to the flower stem with hot glue.


I love how this Bouquet turned out! This daisy file is so versatile I can see myself using it over and over.


Thanks for stopping by!

Shirley

Friday, April 20, 2018

Queen Bee


No automatic alt text available.

My Scrap Chick is having it's first ever Facebook Hop today and tomorrow, so be sure to stop by and check out all the great projects by the Design Team!

The theme of our hop is Spring/ gardening/ Mother's Day.

One sure sign of Spring for me is the reappearance of the honeybees. My project for the hop is a Queen Bee Belly Box and some little worker bees.


I used Bee Belly Box Trio for the box, and the bee from the card for the little bees. The bodies of the little bees are made using the carrot from Carrot Patch Box.

Bee Belly Box Trio: click to enlarge


Carrot Patch Box: click to enlarge


The belly box is 8 inches to the top of the antennas.I used yellow tagboard for the box and bees, white glitter cardstock for the wings and pink glitter cardstock (from COLORBOK) for the noses. I used black and white cardstock from Recollections for the rest. The other cardstock was from my scrap stash. I created an insert for the box that holds the little bees upright in the box. If you make your box a different size, adjust the file to be slightly smaller than the bottom of the box.


  Here is the link to the Design Space file for the box insert:  https://design.cricut.com/#/design/89077526


Check back tomorrow when I will explain how I made the little bees. Thanks for buzzing by.

Shirley


Tuesday, March 27, 2018

Butterfly Wreath


                     After a very long winter it's time for something 
                                       bright and Springlike.


I found this wreath at a thrift store. It was a bit the worse for wear and definitely needed a little sprucing up. I decided to make it into a Spring wreath using butterfly files from My Scrap Chick. If you don't have a wreath that needs sprucing up, you can start with a grapevine wreath and decorate it yourself.


              I used the following files.                  

Butterfly Easel Card: click to enlarge


Butterfly Layers


MATERIALS

12 inch decorated wreath
or 
12 inch grapevine wreath
silk ivy garland
six silk rose sprigs
eucalyptus 
thin wire or hot glue

Butterfly Materials
heavy cardstock print scraps in two main colors
pearlescent cardstock to match the prints
small multicolored gems
coordinating ink
pop dots

For my wreath I just removed the bows and decorated the wreath with butterflies. If you are starting with a bare grapevine wreath, first wrap the wreath with the ivy. Use wire or hot glue to hold the ivy in place, if needed. Tuck in the eucalyptus, evenly spacing it around. Wire or glue in place. Finally, evenly space the sprigs of roses around the wreath in the same manner.

I made approximately 24 butterflies using the butterflies from the two My Scrap Chick files. The butterflies ranged from 2 inches to 3 inches tall. 


All the butterfly bodies were inked with coordinating colors.
The lacy butterflies were glued only in the body sections, then the wing sections were folded up.


The solid layered butterflies were glued in the center of the body, the wings were folded up, and a pop dot was added under the wings near the body.

Small gems were added to the bodies of all the butterflies.


The butterflies were then hot glued to the wreath alternating sizes, directions and positions on the wreath.


I love how this wreath turned out with all the beautiful butterflies by My Scrap Chick! Why don't you give it a try.
Thanks for stopping by! Happy Spring!

Shirley