Saturday, October 27, 2018

Sunflower Greetings Card Set


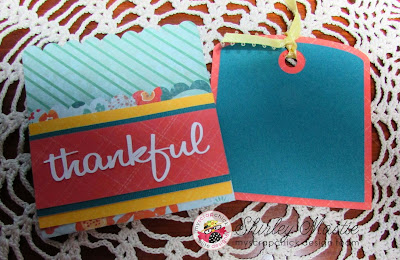
Today I am sharing a sweet Sunflower Greeting Card Set which would make a great Thanksgiving Hostess Gift or just a gift for someone you appreciate.


I made this set using Sunflower Greetings from My Scrap Chick. 

Sunflower Greetings: click to enlarge

The pattern includes patterns for a card, a tag and tag pocket, plus the gift box. I made two cards and two tags, but the box could easily hold three of each.


I used Beach House 
double sided paper by COLORBOK for my project. Double sided paper works best for the box and tag holder so the pattern will show on the inside.


I cut a second mat from the card and tag (blue layer on the tag and orange layer on the card) from white. These were added to the inside of the card and the back of the tag so a message can be added.


I love this set! It's so easy to put together and looks great. Why not make a set for someone you are thankful for.

Thanks for stopping by!
Have a great crafty day!

Shirley

Friday, October 12, 2018

It's Pumpkin Time


HI!
It's pumpkin time!


Today I am sharing a pair of pumpkin boxes made with the My Scrap Chick file Fall Pumpkin Box.

Fall Pumpkin Box: click to enlarge


Materials

Fall Pumpkin Box file by My Scrap Chick
Patterned cardstock from "Old World Stack" by DCWV
brown cardstock by recollections
green lanyard
green and orange twine from Dollar Tree
dark orange leaf ribbon from Dollar Tree
Glue Dots and glue


The pumpkins go together quickly and easily.  I enlarged them to about 6 inches tall. I inked all the edges with orange ink. I added the dark orange leaf ribbon to the bottom edge of the top half of the pumpkin using a combination of glue and small glue dots.

For the top of the pumpkin, I first attached the stem using glue and a large glue dot. Then I inked and shaped the leaves, and glued them down around the stem. I tied a bow around the stem using about a foot each of orange and green twine. The last step was adding the vines.  These were made from green lanyard.


I wrapped the lanyard snugly around a pen and taped the end in place. I then left it in front of a heat source for a few minutes. (I put mine in front of a portable heater.) After it cooled, I unwrapped it and cut it into lengths about 4 to 5 inches long. Using small glue dots, I attached one end behind the stem.

And then this is the finished Fall Pumpkin Box! These will be used for Halloween treat boxes for my granddaughters.
These were so quick and easy to make! 

Thanks for stopping by! 
Happy crafting!

Shirley


Thursday, October 11, 2018

Native American Dream Catcher


Hi my crafty friends!
Today I am sharing a little dream catcher featuring the image, "Mixed Media Native American digi stamp" by Little Blue Button Stamps, which you can find here:  http://lbbstamps.com/product/mix-media-native-american-digi-stamp/

I started with two circles 5.5 inches and 7.5 inches in diameter. (I cut mine from a Ziploc lid and a frozen dinner tray.)


Using Canon Americana yarn, I single crocheted around each hoop keeping the stitches close together and straight across the top.


I then sewed the two hoops together, as shown, being careful to maintain an equal distance between the hoops, all the way around. The stitches are about one inch apart.


I printed the image on a 5 .5 inch circle using design space and my Cricut Maker. I colored the image with Prismacolor Pencils then glued the circle to the back of the smaller circle. 


I cut eight sets of three strands of yarn, cut 15 inches long and folded in half. I attached these groups to the back of the bottom of the larger hoop using bolin knots. Then I braided each group and tied the ends with an overhand knot. Finally, I added paper feathers and beads to the sides and bottom of the larger hoop. The feathers were taken from a free dream catcher svg from Caluya Design. It can be found here:
  https://caluyadesign.com/free-dream-catcher-svg/


I hope you liked my dream catcher.
Thanks for stopping by!

Shirley

Sunday, October 7, 2018

Falling For Autumn Blog Hop

Hello and welcome to our Falling for Autumn blog hop!
Let’s celebrate this beautiful season together! Have you already had some pumpkin spice latte? Isn’t it a gorgeous time: golden leaves, colder air, tasty bakery and drinks!
Today we would like to invite you to have fun together! Our fabulous LBBS design team has prepared a lot of amazing inspirational projects, and our amazing sponsors are ready to gift their prizes!
P.S.… I want to say that you may find some hidden giveaways and discounts in some blogs here=)
So, let’s start!

Here are some information for you to follow:
- surf thru each DT member’s blog - leave a comment under each blog hop post - and read carefully you may find a hidden giveaway or discount code - go back to LBBS blog and leave your last comment there. - Blog hop ends October 8th 2018 at 11:50 p.m. so you have plenty of time to complete your task=)
There are three prizes that will be given to three random winners. First - $25 gift code to LBBS shop lbbstamps.com Second - $25 gift code to IamRoses shop https://www.iamroses.com/ Third - $25 gift code to our DT member’s Joann Stamping’ Up shop www.josscrapshack.com Just subscribe to Jo's blog and leave a comment under blog hop post. Isn’t it great? Three winners will be announced in LBBS blog on October 9th 2018! ADDITIONAL PRIZE: If you would like to win more $25 gift code to LBBS shop please make fall inspired project using one of our dig stamps and add link to Inlinkz down below! Link up is open till October 15th. One winner will be chosen and announced October 16th in the blog and in our Facebook group and Instagram

HIDDEN GIVEAWAY: Include- # I Love Fall! in your comment on this post to be entered for a chance to win the image I used for my projects, Rag Doll Sweetheart Fall Joy Good luck!
Now for my projects!!!

I made an easel card goody box and a tag treat holder using Rag Doll Sweetheart Fall Joy. I created both projects using my Cricut Maker and Design Space.

The easel card goody box combines a 5 1/2 inch easel card with a same size box with a drawer. This is how the project looks in design space. You can find it in design space here: Easel Card Box


I colored my images with Prismacolor Pencils. All the paper piecing accents are from My Scrap Chick. The cardstock is from Bazill and Stampin Up, the prints are from DCWV and The Story of Fall by Echo Park.

The Tag Treat Holder was created in Design Space.


This is the file in design space. You can find it in Design Space HERE:
Instead of the witch I printed my image on the white tag.


Thank you for stopping by! Your next stop is Laine .
Shirley

Monday, October 1, 2018

What's Going On?


Today is New Release Day at Little Blue Button Stamps and I used the adorable What's Going On?  digi stamp for my card. Since my granddaughter is kitty crazy, this stamp was especially fun for me to color.


I colored the image with Prismacolor Pencils.
The standard A2 card base was made from light teal cardstock and the pumpkin colored mat and tag were cut from pumpkin cardstock. A wavy corner accent piece from Cricut was cut from kitty themed paper and added to the upper left. 
I used the image title for my sentiment since I thought it was appropriate. I used design space to write it on the tag. I added two small holes to the top of the tag and tied it with light teal embroidery thread. The tag was attached with glue dots.


Thanks for stopping by!

Have a great day!