Showing posts with label box. Show all posts

Wednesday, June 26, 2019

Star Box


Today in preparation for the 4th of July, I played with the Star Box Trio file from My Scrap Chick. I used the small and medium boxes. I used papers from these paper stacks:

Vintage Nation by the Paper Studio
Americana Designer Paper by COLORBOK

When gluing the boxes together make sure the corners with the deeply cut corners are folded into mountain folds and used as the outside points of the boxes and lids.


Medium Box


Small Box

If you put the layers of the topper together with foam tape you will get a 3-D effect.


I hope you liked my Star Boxes!


Happy Fourth of July!

Shirley

Thursday, September 6, 2018

Quart Jar Gift Wrap


Hi! Today I am sharing a Fall Gift in a Jar project using Jam Jar Candle Gift Wrap- QUART JAR for the jar wrap, and the scene from Harvest Bears for the tree and fence scene.


Harvest Bears: click to enlargeJam Jar and Candle Gift Wrap - QUART JAR: click to enlarge                                                                                                     


The first step was to get a clean quart jar and lid. I then cut out a 4 inch by 2 1/2 inch oval from contact paper and adhered it to a smooth area of the jar. I made sure the oval was attached well. Then I applied three coats of acrylic orange paint to the jar and green to the lid. I removed the contact paper before the jar was totally dry and used a damp cloth to clean up any smears. When the jar was totally dry I added the cookie ingredients. I used Betty Crocker Pumpkin Spice Cookie Mix and Candy Corn M&M's.


Finally, I screwed on the jar lid, tied raffia around the neck of the jar. I used the tag from the Jar Wrap file and a sentiment from Cricut for the tag. I printed the directions for making the cookies on the back of the tag.


I used papers from the Harvest House Stack from DCWV for the Jam Jar Gift Wrap. Colored cardstock was from Recollections. I used the scene  with the tree and fence for the accents on the jar wrap. I sized the file so the fence was 4 inches long. I made four fences and two trees. The trees were attached with foam dots to the two tall sides. Two fences were attached below the trees and the other two fences were attached to opposite sides of the inside box so they will show when the wrap is closed.


I added a bow from the file to the top left of one side. The following picture shows the Jam Jar Gift Wrap open.


These Jam Jar Wraps come in lots of sizes and make a beautiful presentation for so many things.

Thanks for stopping by! 

Shirley


Saturday, July 21, 2018

Picnic Time


Do you want to go on a picnic?


I made this cute little picnic basket using the Picnic Basket and Sandwich file from My Scrap Chick. I also used A2 Layered Roses Card for the flowers.


A2 Layered Roses Card: click to enlargePicnic Basket and Sandwich: click to enlarge


I made the basket using the cream colored cardstock from a Neutrals Stack by Colorbok. I used the Samantha Rose Stack by DCWV for the floral  print, and the pink embossed print by BAZZILL for the exterior panels of the basket. I used a second copy of the basket for the pink basket panels and the floral areas on the lid. The floral strips on the body of the basket are one inch wide at the top and 3/4 inch wide at the bottom. The basket weave effect was created with 1/8 inch wide cream strips cut to size. The handle was attached with cream colored brads. 


The flowers were made from light pink cardstock scraps. A yellow gem was added to the middle of each flower. They were attached to the lower right corner with foam tape. Green leaves were added. A light pink ribbon bow was added to the other side.


This basket would be perfect for a small present or treat. I love it!

Have a great weekend: maybe go out for a picnic!

Shirley


Sunday, March 4, 2018

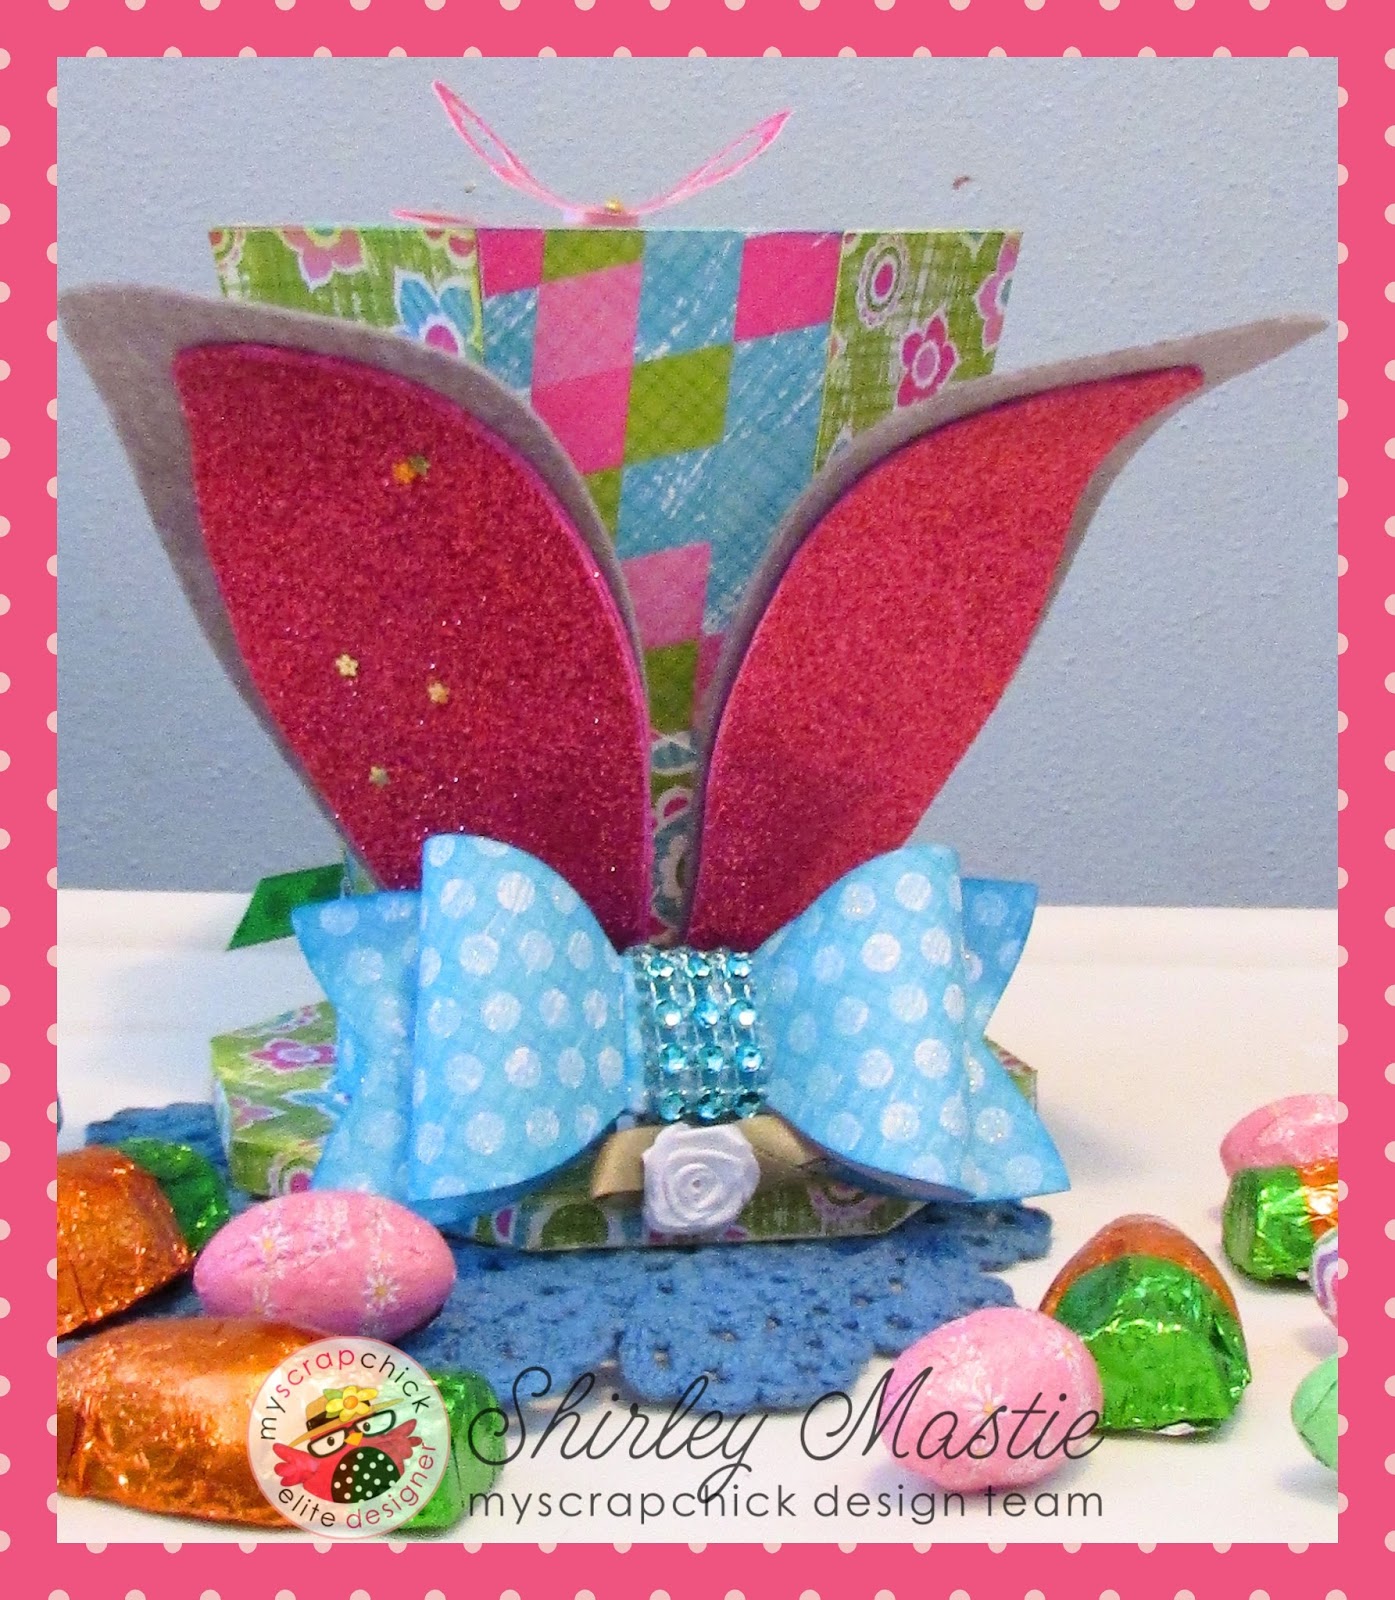
Mad Hatter Bunny Hat


One of my favorite files from My Scrap Chick is  the Uncle Sam Hat Box. I love figuring out new ways to use this versatile file. This time I used it to make a Mad Hatter Bunny Box.


MATERIALS

Uncle Sam Hat Box
Bunny Top Hat Box (for the ears)
Jam Jar and Candle Gift Wrap (for the bow)
 Pixey Stix Glitter Pack by the Paper Studio
Grey felt from The Summer Sky Set by Cricut
Raspberry Confetti Peel & Stick Foam Sheet by Foamies
Paper Flowers by Jots
Butterfly Paper Accents by K & Company
Blue Diamond Wrap by Floral Garden
Small white silk flower
1/4 inch wide green ribbon


I made the hat following the PDF instructions. See how I put the hat together here: https://scrappysamdesigns.blogspot.com/2017/12/frostys-top-hat.html  I cut each of the long strips in half diagonally and alternated gluing them to the top and bottom of each section of the hat starting with the bottom section of a notched section. (See picture below.)


I made 6 inch ears using the Bunny Top Hat Box file. The larger piece was cut from grey Cricut felt and the inner ear was cut from the raspberry confetti foam.  I cut one inch off the bottom then glued the ears to the front of the hat. I cut a 1 inch by 9 inch strip of the blue dot cardstock and wrapped it around the base of the hat gluing it together in the front. I then made a 4 inch bow from the blue dotted cardstock and the bow from Jam Jar and Candle Gift Wrap, and wrapped the center with the blue Diamond Wrap. The finished bow was attached in front of the ears with foam tape and a little white silk flower was attached below the bow.


I made a bow from the ribbon and added the bow and a blue flower to the back with foam tape. A butterfly accent was added to the top of the inner box.


The inner box lifts out. This will make a cute Easter basket for one of my granddaughters.


I love how this little Mad Hatter Bunny Box turned out! What can you make with the Uncle Sam Hat Box?

Thanks for stopping by!

Shirley

Sunday, January 14, 2018

Snowman Easel Match Box


Hi! Today I am sharing a cute snowman easel match box. I created this project by combining two files from My Scrap Chick, Snowman's Friend Easel Card and Sweet Nugget Matchboxes.


Snowman's Friend Easel Card: click to enlargeSweet Nugget Matchboxes: click to enlarge             

Keeping all the pieces grouped together, I started by making the easel card so it is six inches wide. I made the snowman using glitter cardstock from Coredinations. The rest of the card was made using papers from my stash. I attached the nose, hat brim and arm with foam tape to give the snowman dimension.  A snowflake and blue gem embellishment was added to the hat band. The sentiment was accented with snowflakes and also attached with foam tape. (My sentiment came from Digital Delights by Louby Loo.)


For the drawers I kept the file grouped together, then sized it so the box measured three inches across. I made two of these out of tagboard so they were sturdier. I glued the two boxes together, side by side, then wrapped them in a coordinating piece of heavy cardstock. The easel card was then attached on top of the two boxes.


I used my snowman box to gift some tea to a tea loving friend, but it would be great for any small treasures. I love how it turned out! 


Thanks for stopping by. I'd love to hear what you think. 

Shirley


Monday, January 1, 2018

Snowman Box


HAPPY NEW YEAR!


We have definitely been having chilly weather lately - COLD! That made me think of snowmen and how to make one without freezing. I came up with this snowman box using four stacking boxes. Here's how I made him.

MATERIALS

Creepy Crawlers Trio svg from My Scrap Chick
Snowman's Friend Easel Card svg from My Scrap Chick
 white tagboard
heavy black  cardstock 
black burst cardstock 
white glitter cardstock by coredinations
orange scrap cardstock
1 large and 4 small glitter snowflake stickers (from Dollar Tree)
1 snowflake gem and 6 small clear gems (from Dollar Tree)
blue Diamond Wrap (from Dollar Tree)
2 inch sheer snowflake wired ribbon (Walmart)
4 - 1/2 inch blue buttons
white glitter tape (Cricut)

I used the box from this set for my snowman.

Creepy Crawlers Trio: click to enlarge


I made three white boxes in graduated sizes, 5 3/4 inches, 5 1/4 inches and 4 3/4 inches across. I made the base layer from tagboard for stability then added mats of glitter cardstock to each panel on the boxes and lids.

The bottom of the two smaller boxes is glued to the lid of the next larger box. I added the blue Diamond Wrap around the band of the largest box lid and added four small snowflakes and blue buttons down the front of the bottom two boxes. I made a snowman face using the one from Snowman's Friend Easel Card  and added it to the front panel of the smallest white box.


For the hat I made a 4 1/4 inch black box and added mats from a black burst cardstock from my stash. I duplicated the octagon from the pattern and made one 6 1/4 inches in black, and one 5 1/2 inches from the burst cardstock. These were used to make the brim of the hat. The black box was placed upside down on the brim and glued in place. White glitter tape was wrapped around the outside of the black box lid to make a hat band. The large snowflake was added to the front of the hat and then accented with the snowflake gem and 6 clear gems.


Each of the boxes will open so you have four nice compartments to use for storing goodies.


I hope you liked my little snowman box. Thanks for stopping by! 

Shirley


Sunday, December 3, 2017

Frosty's Top Hat


Hi! Today I am sharing a fancy snowman top hat box I made with files from My Scrap Chick.  I used Uncle Sam Hat Box for the box and Snowflake Layers for the large snowflake.

MATERIALS

Uncle Sam Hat Box and Snowflake Layers  files from My Scrap Chick
"Old World Winter" cardstock by the Paper Studio 
Glitter cardstock by Recollections
various Christmas silk florals
3/4 inch ribbon
snowflake stickers
small gems in sage and yellow
tape runner, glue and paper clips

After cutting out the pieces, I glued the main pieces together using a combination of tape runner and glue. The tape runner and paper clips hold the pieces together while the glue dries. 


The two largest octagons are used for the brim and the smaller ones are used for the boxes. 3/4 inch ribbon was added around the base of the hat. (I used 1/1/2 inch wide ribbon folded down to 3/4 inch. )
I used pieces of various floral stems to decorate the hat. I made a layered snowflake to add and also used snowflake stickers.


The inner part of the box lifts out as shown.


I love this file! You can use it for so many occasions! 

Thanks for stopping by!


Tuesday, November 14, 2017

Pint Jar Gift Wrap Holder


Hi! Today I am sharing a holder for a pint jar of body scrub I will be giving to a friend. I love how this turned out! I used Jam Jar and Candle Gift Wrap- Pint Jar and Little Girl Digi Stamps for my project.


Little Girl Digi Stamps: click to enlargeJam Jar and Candle Gift Wrap - PINT JAR: click to enlarge


I used "Cartulina Pink" by Recollections for the base of my gift wrap holder and prints from "Uptown Flair" from The Paper Studio for the mats, bow and flower.    There is a great pictorial tutorial on the MSC website on how to put together this  pint jar gift holder.   


I used Design Space to add the little spa girl  from Little Girl Digi Stamps and the sentiment (from Digital Delights by Louby Loo) to the tag that is included with the pint jar holder. I colored the image with Spectrum Noir Alcohol markers.

I love these jam jar/candle gift wrap holders! They are so versatile and can be used for so many things! They are also super easy to make! 

Relax and enjoy your day!


Saturday, July 15, 2017

Kitty Cat Birthday Set


My granddaughter is a kitty lover so I made her this cute gift set for her ninth birthday. I used the following files from My Scrap Chick for my set.

     Explosion Box: click to enlarge     Kitty Cats Belly Box Trio: click to enlarge  Paper Bow Wrap
                   Explosion Box                          Kitty Cats Belly Box Trio               Paper Bow Wrap


MATERIALS

Files from MSC:    Explosion Box , Kitty Cats Belly Box Trio,   Paper Bow Wrap and an easel base from Easel Card Collection.

Printed Cardstock: Joie De Vivre by DCWV, Modern Millinary Signature Paper by Colorbok and Pink Dot by Bazzill.

Other cardstock by Coredinations

small amount of 1/4 inch wide dark pink ribbon

1/4 inch clear gem

tape runner and glue


Keeping the box pieces grouped together, I sized the bottom of the box to be 11.5 inches. I used the kitty from the card and the paw print from the tag from the Kitty Cats Belly Box Trio as decorations for my box.


I added the card front to a base from  Easel Card Collection to make it an easel card .


My grandaughter was thrilled with this set and I'm sure any kitty lovers you know will love it just as much! 

Thanks for stopping by! I'd love to hear what you think so please leave a comment.

                            Happy crafting! ~Shirley