Tuesday, March 26, 2019

Miss Lilly Bunny Easter Easel Card


Today I am on the Little Blue Button Stamps Blog with an Easter easel card using the sweet image, Miss Lilly Bunny 


The card base is a cut file from Digital Delights by Looby Loo.  You can make a similar easel card base by taking a seven inch egg shape, adding a 6.25 inch oval on top. Make a fold line at 2 inches and 3.5 inches. Fold forward on these fold lines as shown below. A 5 inch half circle and a 4.5 inch half circle were added to the front. 


I used Cricut Design Space to attach the image to a 4 inch oval. I colored the image with Prismacolor Pencils, then mounted the colored image on a 4.75 inch scalloped oval.


 I added a 2 inch sentiment, also from Digital Delights, that was added to a 2.5 inch scalloped oval. Both ovals were accented with clear gems. Finally the card was accented with eight pink paper flowers.


Thanks for stopping by! 
Happy Easter!


Monday, March 11, 2019

Kite Sophie and Sam


Hi! March is known as a kite flying month, so I used Kite Sophie and Sam from Little Blue Button Stamps to make a kite shaped card.

closed


open


I created the file in Design Space. Dotted lines are score lines and solid lines are cut lines.

Start with cardstock that measures 12 by 5 inches. Mark the points that is 3.5 inches in from the outside edges along the long sides. They will be at 3.5 and 8.5 inches along the top and bottom. Make fold lines from the top left to the bottom right point, and from the top right to the bottom left point. It will form an X. Make an additional fold line down the center at 6 inches.  The center fold will be a valley fold and the others will be mountain folds.

Next, along the short sides, mark the center point at 2.5 inches. Connect this point to the closest marked points at the top and bottom of the long sides creating triangle shapes at the corners. These are cut lines, so cut off these corners.


I colored the image with my Spectrum Noir Tri-Color Alcohol Markers.


 I fussy cut the image and mounted it to the card front with foam tape. I added a twine tail and ribbon ties.


Thanks for stopping by!
Go fly a kite!


Tuesday, March 5, 2019

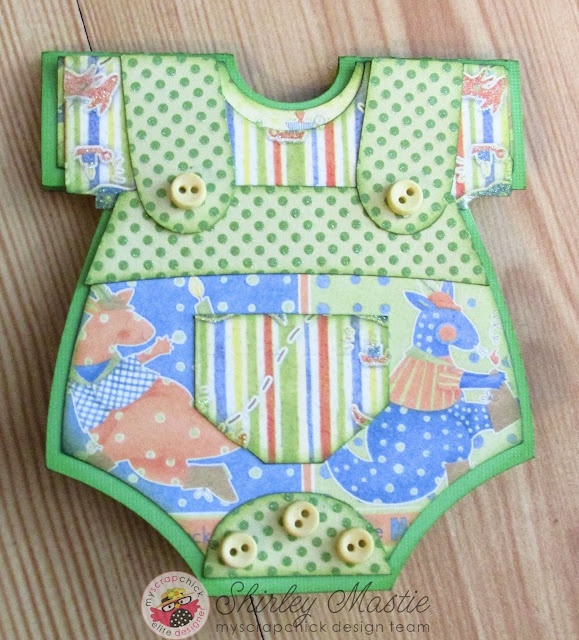
Boy's Onesie Gift Box Set


A dear friend of mine recently gave birth to a sweet little baby boy and I knew that I had to make her this adorable gift box and card set.


I used Onesie Gift Box-Boy for the gift box and Onesie Overalls Flat Fold Card for the gift card. Both files are from My Scrap Chick.

Onesie Gift Box Boy : click to enlargeOnesie Overalls Flat Fold Card: click to enlarge          

 The box was sized so it fit on a 24 inch mat. I used tagboard for the box and the Nursery Rhyme Glitter Stack from Debbie Munn for the prints.The green dotted glitter cardstock is from Uptown Flair by the Paper Studio. I used real buttons as accents.


For the card I used Stampin Up Cardstock for the card base and the same cardstock stacks as for the box.  Again I used real buttons for accents.


I hope you liked my little boy gift box set. 
Thanks for stopping by.

Shirley

Friday, March 1, 2019

Tasty Cupcake Stacked Card


Hi! Today is New Release Day at Little Blue Button Stamps and I used "Tasty Cupcake" to make this cute stacked cupcake card.


I started by uploading the file into Design Space and saving it as both a cut file and a print then cut file. I duplicated the cut file so I had three cupcakes. Two of the cupcakes are 3.5 inches tall and the other one is slightly smaller at 3 inches. I stacked the three cupcakes with the smallest one at the top and lining them up so part of each cupcake lines up along the left edge. I selected all three cupcakes and welded them together. I duplicated this piece, then flipped one piece vertically. Two pieces were line up back to back so they line up where the two pieces meet. I selected both pieces and welded them together, then added a fold line down the middle and attached it in place.

I cut this card base from the cupcake print from the Confetti Stack by DCWV.


I next took the print then cut file and duplicated it so I had three cupcakes. I sized them to match the cupcakes on the card base, then attached them to rectangles. These were printed on the paper I  used to color the images. I then took a white piece of 8.5 by 11 white cardstock and laid it on top of the paper with the printed cupcakes. Holding it up to the light so I could see the cupcakes underneath, I then attached with tape scraps of paper that I wanted for my cupcake bottoms. I then used this paper to make a second copy of the cupcakes. 


Using my Spectrum Noir Alcohol Markers, I colored the bottom and top cupcakes so they had pink frosting, and the middle one with blue frosting. I added Spectrum Noir Clear Sparkle Pen to each one, then added some seed beads to each one. I cut out and glued the bottom to each one, then added a paper pieced flower (from My Scrap Chick) to the bottom two cupcakes and a cherry to the top cupcake.


I love how this stacked cupcake card turned out! 
Thanks for stopping by and I'd love to hear what you think.

Happy Crafting!