Friday, July 26, 2019

Picnic Sophie


Hi! Today I am sharing my last DT project for Little Blue Button Stamps.


I used the sweet image, "Picnic Sophie" which can be found HERE:


I created the easel card using files from Bird's Cards. The card base is cut from "Watercolor Ombre" Stack by DCWV.  The floral frame was cut from Pearlescent Cardstock by Recollections. The card is accented with purple gel gems and paper flowers. The sentiment is from Digital Delights by Louby Loo and was added using foam squares.
"Picnic Sophie was colored with my Tri-Blend Markers from Spectrum Noir. She was also attached to the card base with foam squares. 


Thanks for stopping by!
Happy Crafting!


Tuesday, July 23, 2019

Mouse Ballet Slipper


It's Christmas in July At My Scrap Chick!
 I fell in love with this little "Mouse Ballet Slipper" and just had to make one.


You can find the svg file HERE:

MATERIALS LIST

Mouse Ballet Slipper svg
Cricut Felt in gray and pink
Scraps of green and red glitter cardstock
Black cardstock scrap
Two 3/8 inch wiggle eyes
3/8 inch pink gel sticker
6 inch piece of 1/8 inch wide red ribbon
Tacky glue
small clips (optional)
small glue dots

I cut the mouse body pieces and ears from Cricut Felt. I glued the pieces of the body together using Tacky Glue and held the pieces together while they dried with small clips. The mouse sole measures 4.5 inches long.


The ears slip into the slots and I added a dab of glue behind each ear to hold them in place. I also glued the tail at the back of the slipper.


I used Glue Dots to attach the eyes and nose and whiskers. I added the holly pieces with Tacky Glue.


I love this adorable little "Mouse Ballet Slipper!" I think I need to make another so I have a pair.

Thanks for stopping by!


Shirley


Monday, July 22, 2019

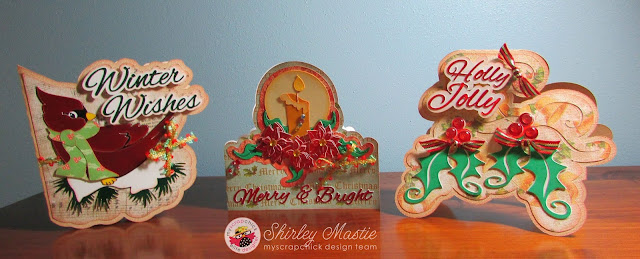
Christmas Shape Cards


It's Christmas in July at My Scrap Chick!
For my project I made three Christmas shape cards. I used Winter Wishes Christmas Card, Merry & Bright Christmas Card and Holly Jolly Christmas Card


I created my cards in Design Space. I grouped all the pieces of each card together and sized the card so the card base measured 11.5 inches. The finished cards range from 5.25 to 5.5 inches tall.

MATERIALS

Printed cardstock: Old World Winter Stack by the Paper Studio
Plain Cardstock by Coredinations
Glossy cardstock in white, red, green and black (source unknown)
Cream & gold pearlescent cardstock by COLORBOK (for candle)
Christmas trims
Various gems (Jots)
Coordinating inks
Foam squares
glue

All the pieces were inked with coordinating inks. The cards were put together with glue and foam squares to make the titles pop. Gems and Christmas trims were added as accents. 

I love these cards; they are so easy to make and turn out so beautiful!
Give them a try!

Thanks for stopping by!

Shirley

Thursday, July 11, 2019

Miss Lilly in the Garden

H, I forgot to publish this project I created for the Little Blue Button Stamps Blog. I made a Dutch Fold Card using "Miss Lilly in the Garden." 


Miss Lilly in the Garden can be found HERE.

The card base starts with a 4 by 10 inch printed purple piece of cardstock folded down at four inches from the top.  Using Cricut Design Space, I added a sentiment( from Digital Delights by Louby Loo) in the center of a 3 3/8 by 5 1/2 inch white piece of cardstock. This was then matted onto a 3 1/2 by 5 7/8 piece of light yellow cardstock, then added to the inside of the card base. I then added three pansies from Cricut to the bottom, and two purple flower gems to the top corners.


A 2 inch by 8 1/8 inch piece of purple cardstock was used as the wrap around at the bottom. I scored this piece at 2 1/16 inches in from each end. I added a double mat to this piece and a purple flower gem to each flap.


Using Cricut Design Space, I added the image to a 4.5 inch oval which was double matted on a purple print, then light yellow. I colored the image using Prismacolor Pencils. I double matted the front flap in yellow and white then added the matted image so it overlapped at the bottom by 3/4 inch.


I love this image of Miss Lilly with her wheel barrow full of pansies.

Thanks for stopping by!


Monday, July 1, 2019

Flower Cone Card


Today is New Release Day at Little Blue Button Stamps and I have made this criss cross card using "Flower Cone." The New Releases can be found HERE:

I started with a 5.5 by 12 inch piece of double sided patterned cardstock. ( I used an Ancestry.com double-sided designer paper from K and Company for my card. ) Along the 12 inch side I folded the cardstock at the 4 inch and 8 inch points. I then cut from the bottom left (point 1) to the top of the 4 inch fold (point 2). Then I cut from the bottom right edge (point 3) to the top of the 8 inch fold (point 4). ( 1 to 2 and 4 to 3 to create a shape as below. )


A scalloped border was added to each of the top edges, cut from cream pearlescent cardstock. I also added a dainty cream trim to the diagonal edges. A sage bow and three cream flowers were added to the left flap as shown.


To make the tag I printed the Flower Cone image on a 3.25 by 4.75 piece of white cardstock. I colored the image with Prismacolor Pencils. I inked the edges with sage ink. The finished image was mounted on a 3.5 by 5.0 cream pearlescent cardstock, then a 3.75 by 5.25 piece of the same double sided cardstock that was used for the criss cross section.


The finished card.


I hope you liked my criss cross card. 
Thanks for stopping by!