Friday, December 13, 2019

3-D Snowflakes


We certainly have been getting a lot of snow lately. In between trips outside to shovel the snow I made some 3-D snowflake decorations.


I used Rosette Frozen Snowflake for the base of the snowflake and Snowflake Layers for the rest of the snowflake.

Rosette Frozen SnowflakeSnowflake Layers: click to enlarge

The base rosette layers is sized to a height of 12 inches, and is cut from white cardstock. The finished rosette is about 7.5 inches across.

The Snowflake layers are cut from glitter cardstock. I used the layer with the solid center as the bottom layer. It was cut from white glitter cardstock and is about 5.5 inches across. The other two layers were cut from two shades of blue or pink glitter cardstock and measure 4.5 inches and 3.8 inches across. I inked each snowflake with coordinating ink.


 The Snowflake Layers were stacked together with foam tape and foam dots to add dimension.

Top layer.

Middle layer. 


Bottom white layer.

A .75 inch glitter snowflake sticker was put in the center and a .25 inch gel gem sticker added to the center of the glitter snowflake.


These snowflakes make beautiful tree ornaments, but I ended up putting mine in my bow window. Try making some; they're quick and easy, and so pretty!

Happy Winter! 

Shirley

Monday, December 2, 2019

Drummer Bear Box Card


Hi! I am officially starting to make my Christmas cards. Today I made this adorable "Drummer Bear Box Card" from My Scrap Chick. 


You can find the file HERE:

MATERIALS LIST

CG-Drummer Bear Box Card file from My Scrap Chick
Red glitter cardstock from AMERICAN CRAFTS
Pearlescent Paper by COLORBOK in gold and black.
Brown, tan and white cardstock by Recollections
Black Rhinestones from Micheal's
Aleenes Tacky Glue and Zig Two Way Glue

Before you put the rest of the card together, glue the head to the inside back of the card base. I added the hat with foam tape to add dimension.


Next, make the hands, making sure to add the drumsticks to the back of the hand. Add the pieces to create the top of the drum before adding the hands to the center piece, again using foam tape.


Using Aleenes Tacky Glue, put the card base together with the glitter on the outside. I hold things together with paper clips while everything dries. Add the center piece by gluing it in the middle of the box section. 


Add the drum details. I added black rhinestones to the points of the W shaped piece on the front.


And here is a side view of the finished Drummer Bear Box Card. I really love him in the glitter cardstock.

Thanks for stopping by! 

Shirley

Wednesday, October 30, 2019

Witch Shoes


Hi! Sorry I've been MIA for awhile. My son and his family have been building a house and everything has been going wrong. Anyway, since tomorrow is Halloween, I figured it was time to make treat boxes for my granddaughters.


For my witch shoes I used CG_Witch Shoe Box from My Scrap Chick.

CG - Witch Shoe Box: click to enlarge


I enlarged the file slightly and followed the included PDF instructions on how to put the shoes together. It was very easy to do. I used the Spooky Delight stack by DCWV for my shoes. I also used scraps of orange glitter cardstock for the buttons and gold glossy cardstock for the buckle. I inked all the edges with black ink. The finished shoe measures 6.5 inches long by 5 inches tall. 


I think my granddaughters will love them. It's a quick project, so there is still plenty of time to make one or two Witch Shoe Boxes for your little witches and goblins. 

Thanks for looking. Happy Halloween!

Shirley

Friday, September 27, 2019

Michigan t-shirt


While camping last week I made this Michigan t-shirt.


I used State Designs Michigan from My Scrap Chick for my t-shirt. I used the contour feature in Design Space to remove the heart from the Lower Peninsula and the slice feature to add a heart to the UP where I live. 


I started with a 11.5 inch square of camping themed fabric and ironed Heat and Bond Lite to the back. I cut the design out, then ironed it onto my t-shirt. Using two strands of embroidery floss, I blanket stitched around the images.


Even though my stitching is far from perfect, I'm happy with the way my t-shirt turned out, and it was a lot of fun to make.


Why not try to make a t-shirt for your home state?

Thanks for stopping by!


Shirley


Wednesday, September 4, 2019

Pirate Ship Boxcard

Ahoy Maties!


Hi! Today I am sharing this cute Pirate Ship Box Card from My Scrap Chick. You can find the file HERE: I also added a little pirate using the Bella and Baxtor Pirates file which you can find Here:


               CG - Pirate Ship Box Card: click to enlarge                                               Bella & Baxtor Pirates: click to enlarge       

The files imported into Design Space at the correct sizes. I used the Warm & Cozy Stack from the Jen Hadfield Home Made Collection for the boat base. I used scraps from my stash for everything else. The card went together easily.

The little pirate was made 3 inches tall including his hat. I attached him to the card with a couple foam dots.


Thanks for stopping by.


Shirley

Thursday, August 1, 2019

Puzzle Girl Autism Awareness Card


Hi! 
Today is New Release Day at Little Blue Button Stamps and I had the privilege of using "Puzzle Girl" for my project. You can find the New Releases HERE:

When I saw this image I immediately thought of Autism, so I decided to make an Autism Awareness card. The card is large at 5 by 7 inches. The framed puzzle file is from Cricut and the sentiment was inspired by a sentiment found on Pinterest. I used tiny alphabet gems I had in my stash for the sentiment.


The image was printed out in Design space at 4 inches. I colored her with Spectrum Noir Alcohol Markers and fussy cut her out leaving a narrow white border . She was mounted onto the card base with foam tape.


I hope you liked my Autism Awareness card. Thanks for stopping by.


Friday, July 26, 2019

Picnic Sophie


Hi! Today I am sharing my last DT project for Little Blue Button Stamps.


I used the sweet image, "Picnic Sophie" which can be found HERE:


I created the easel card using files from Bird's Cards. The card base is cut from "Watercolor Ombre" Stack by DCWV.  The floral frame was cut from Pearlescent Cardstock by Recollections. The card is accented with purple gel gems and paper flowers. The sentiment is from Digital Delights by Louby Loo and was added using foam squares.
"Picnic Sophie was colored with my Tri-Blend Markers from Spectrum Noir. She was also attached to the card base with foam squares. 


Thanks for stopping by!
Happy Crafting!


Tuesday, July 23, 2019

Mouse Ballet Slipper


It's Christmas in July At My Scrap Chick!
 I fell in love with this little "Mouse Ballet Slipper" and just had to make one.


You can find the svg file HERE:

MATERIALS LIST

Mouse Ballet Slipper svg
Cricut Felt in gray and pink
Scraps of green and red glitter cardstock
Black cardstock scrap
Two 3/8 inch wiggle eyes
3/8 inch pink gel sticker
6 inch piece of 1/8 inch wide red ribbon
Tacky glue
small clips (optional)
small glue dots

I cut the mouse body pieces and ears from Cricut Felt. I glued the pieces of the body together using Tacky Glue and held the pieces together while they dried with small clips. The mouse sole measures 4.5 inches long.


The ears slip into the slots and I added a dab of glue behind each ear to hold them in place. I also glued the tail at the back of the slipper.


I used Glue Dots to attach the eyes and nose and whiskers. I added the holly pieces with Tacky Glue.


I love this adorable little "Mouse Ballet Slipper!" I think I need to make another so I have a pair.

Thanks for stopping by!


Shirley


Monday, July 22, 2019

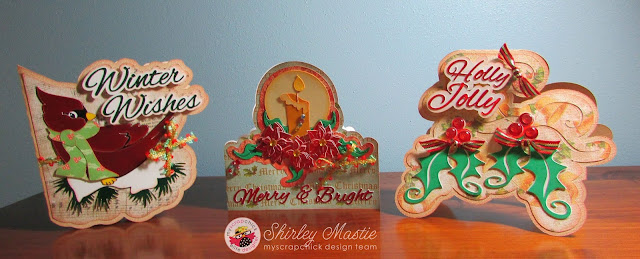
Christmas Shape Cards


It's Christmas in July at My Scrap Chick!
For my project I made three Christmas shape cards. I used Winter Wishes Christmas Card, Merry & Bright Christmas Card and Holly Jolly Christmas Card


I created my cards in Design Space. I grouped all the pieces of each card together and sized the card so the card base measured 11.5 inches. The finished cards range from 5.25 to 5.5 inches tall.

MATERIALS

Printed cardstock: Old World Winter Stack by the Paper Studio
Plain Cardstock by Coredinations
Glossy cardstock in white, red, green and black (source unknown)
Cream & gold pearlescent cardstock by COLORBOK (for candle)
Christmas trims
Various gems (Jots)
Coordinating inks
Foam squares
glue

All the pieces were inked with coordinating inks. The cards were put together with glue and foam squares to make the titles pop. Gems and Christmas trims were added as accents. 

I love these cards; they are so easy to make and turn out so beautiful!
Give them a try!

Thanks for stopping by!

Shirley

Thursday, July 11, 2019

Miss Lilly in the Garden

H, I forgot to publish this project I created for the Little Blue Button Stamps Blog. I made a Dutch Fold Card using "Miss Lilly in the Garden." 


Miss Lilly in the Garden can be found HERE.

The card base starts with a 4 by 10 inch printed purple piece of cardstock folded down at four inches from the top.  Using Cricut Design Space, I added a sentiment( from Digital Delights by Louby Loo) in the center of a 3 3/8 by 5 1/2 inch white piece of cardstock. This was then matted onto a 3 1/2 by 5 7/8 piece of light yellow cardstock, then added to the inside of the card base. I then added three pansies from Cricut to the bottom, and two purple flower gems to the top corners.


A 2 inch by 8 1/8 inch piece of purple cardstock was used as the wrap around at the bottom. I scored this piece at 2 1/16 inches in from each end. I added a double mat to this piece and a purple flower gem to each flap.


Using Cricut Design Space, I added the image to a 4.5 inch oval which was double matted on a purple print, then light yellow. I colored the image using Prismacolor Pencils. I double matted the front flap in yellow and white then added the matted image so it overlapped at the bottom by 3/4 inch.


I love this image of Miss Lilly with her wheel barrow full of pansies.

Thanks for stopping by!


Monday, July 1, 2019

Flower Cone Card


Today is New Release Day at Little Blue Button Stamps and I have made this criss cross card using "Flower Cone." The New Releases can be found HERE:

I started with a 5.5 by 12 inch piece of double sided patterned cardstock. ( I used an Ancestry.com double-sided designer paper from K and Company for my card. ) Along the 12 inch side I folded the cardstock at the 4 inch and 8 inch points. I then cut from the bottom left (point 1) to the top of the 4 inch fold (point 2). Then I cut from the bottom right edge (point 3) to the top of the 8 inch fold (point 4). ( 1 to 2 and 4 to 3 to create a shape as below. )


A scalloped border was added to each of the top edges, cut from cream pearlescent cardstock. I also added a dainty cream trim to the diagonal edges. A sage bow and three cream flowers were added to the left flap as shown.


To make the tag I printed the Flower Cone image on a 3.25 by 4.75 piece of white cardstock. I colored the image with Prismacolor Pencils. I inked the edges with sage ink. The finished image was mounted on a 3.5 by 5.0 cream pearlescent cardstock, then a 3.75 by 5.25 piece of the same double sided cardstock that was used for the criss cross section.


The finished card.


I hope you liked my criss cross card. 
Thanks for stopping by!