Sunday, April 15, 2018

Butterfly Easel Card


I hope you are having a nicer Spring day than we are having. We are in the middle of a nasty Spring snow storm. To get myself into a more "Springy" mood I made this pretty Butterfly Easel Card.


I love the filigree butterflies from Butterfly Easel Card by My Scrap Chick. I recently used it for a wreath and thought it was time I actually made the card. I love how it turned out!

MATERIALS

 Butterfly Easel Card  file from My Scrap Chick
"Hello" sentiment from Cricut
"Pixey Stix Glitter Paper Pack from the Paper Studio
Pink, champagne and blue pearlescent cardstock by Recollections
Pink and small blue gems from Jots
Pink and blue ink (optional)
Pop Dots and Foam Tape
Glue runner and glue

The filigree layers of the butterflies and the blue oval behind the sentiment were cut from the pearlescent cardstock. The other pieces were cut from the Pixey Stix Pack.  All pieces were inked. The card measures 5 -1/4 by 6 -1/4 inches. The small butterfly was glued only in the body and the top layer of the wings were bent up. Gems were added to the body of each butterfly. The little butterfly was attached to the larger butterfly with Glue Dots.


 The sentiment is 1-1/8 inches tall. The bottom two layers were attached with foam tape. 


I traced the bottom section of the card to the back of the pink print and cut a quarter inch outside the line with a decorative Scissor. (Yes, I still have decorative scissors. I'm a Pack Rat, what can I say.) This piece was glued under the card base pink side up. 

This card is so pretty and feminine in person. 


Thanks for stopping by! I'd love to know what you think, so feel free to leave a comment. 

Happy Spring!

Shirley

Wednesday, April 4, 2018

Teacup Easel Card


Today is my daughter-in-law's birthday so I had to make her a cute little card in her favorite color. I used Teacup Easel Cards with Pockets, and for the tag, Party Owls, both from My Scrap Chick.

Teacup Easel Cards with Pockets: click to enlarge


Party Owls: click to enlarge


MATERIALS

Happy Birthday 2 U sentiment from Bird's Cards
Fresh Linen Papers, Stickers & Die-cuts pack by COLORBOK
Sturdy purple, lavender and a bit of white cardstock to coordinate with prints 
Aqua pearls by Jots
Lavender paper flower
Aqua tulle scrap 
Glue Dots, Pop Dots, adhesive

I slightly enlarged the card to 5 inches so I could put a gift card into the pocket. The tag is 2 1/4 inches tall and the sentiment is 1 7/8 inches across. The card base, cup base, large scalloped circle, tag base, pom, pom and sentiment were cut from purple. The top layer of the tag, small circle and sentiment shadow were cut from lavender. The large circle behind the sentiment and the party hat were cut from the striped print: the top layer of the teacup was cut from the purple flower print. (I cut two of these to make it more stable.)

 I inked all the pieces with purple before assembling the card. Make sure you glue the top layer of the teacup only on the two sides and the bottom so you leave an opening at the top for your gift card, teabag or whatever.

I added pearls around the lavender circle by the sentiment, and added a slightly curved line of pearls at the top of the cup.  I made  a 2 1/2 inch bow from the tulle, then added it and the lavender flower, with glue dots, one inch in from the top right corner of the cup. The tag was tucked in under the bow and attached with glue at the top, and pop dots at the bottom. 


I hope my Daughter -in-Law likes her card. 


Thanks for stopping by!

Shirley

Tuesday, March 27, 2018

Butterfly Wreath


                     After a very long winter it's time for something 
                                       bright and Springlike.


I found this wreath at a thrift store. It was a bit the worse for wear and definitely needed a little sprucing up. I decided to make it into a Spring wreath using butterfly files from My Scrap Chick. If you don't have a wreath that needs sprucing up, you can start with a grapevine wreath and decorate it yourself.


              I used the following files.                  

Butterfly Easel Card: click to enlarge


Butterfly Layers


MATERIALS

12 inch decorated wreath
or 
12 inch grapevine wreath
silk ivy garland
six silk rose sprigs
eucalyptus 
thin wire or hot glue

Butterfly Materials
heavy cardstock print scraps in two main colors
pearlescent cardstock to match the prints
small multicolored gems
coordinating ink
pop dots

For my wreath I just removed the bows and decorated the wreath with butterflies. If you are starting with a bare grapevine wreath, first wrap the wreath with the ivy. Use wire or hot glue to hold the ivy in place, if needed. Tuck in the eucalyptus, evenly spacing it around. Wire or glue in place. Finally, evenly space the sprigs of roses around the wreath in the same manner.

I made approximately 24 butterflies using the butterflies from the two My Scrap Chick files. The butterflies ranged from 2 inches to 3 inches tall. 


All the butterfly bodies were inked with coordinating colors.
The lacy butterflies were glued only in the body sections, then the wing sections were folded up.


The solid layered butterflies were glued in the center of the body, the wings were folded up, and a pop dot was added under the wings near the body.

Small gems were added to the bodies of all the butterflies.


The butterflies were then hot glued to the wreath alternating sizes, directions and positions on the wreath.


I love how this wreath turned out with all the beautiful butterflies by My Scrap Chick! Why don't you give it a try.
Thanks for stopping by! Happy Spring!

Shirley


Wednesday, March 14, 2018

Girl Bunny Box


Hi, Easter will be here before we know it, so I have been busy making this cute little girl bunny box. 


I used Bunny Hat Box from My Scrap Chick  for my box.  I left off the bird and made my bunny from Fun Foam.

Bunny Top Hat Box: click to enlarge


MATERIALS

 Bunny Hat Box file from My Scrap Chick
White poster board
9 by 11 inch white Fun Foam
Pink Cardstock by Coredinations
Bunny printed Cardstock by DCWV
Pink glitter cardstock by Coredinations
Black and white cardstock scraps
Pink Mulberry Paper Flowers by Prima
Small pink flower gem by Jots
1 1/2 inch wide sheer pink ribbon
5/8 inch wide gathered white lace trim
Xyron, glue, glue runner
Light blue and pink ink pads
0.4 black Cricut marker
White Gelly Roll pen

I made the box slightly larger than it imports, using white poster board for the body.  I used a combination of glue and glue runner and paper clips to hold it together while it dried. I cut the face panels, muzzle and ears from Fun Foam, inked the edges, and ran them through a Xyron before attaching them. The eyes were accented with the black Cricut marker and the white Gelly Roll pen.


The outer ears were attached to the pink ears pieces.


The ear pieces were attached to the hat base one at a time. 


I lined the ears up so they matched and attached them together. ( I used clips to hold the ears together, but the clips left marks, so I would use a different method next time.)


I attached the hat brim, then using glue runner and glue I added the gathered lace around the outside edge.


I added the printed panels that were inked along the edges with pink. I folded the pink ribbon in half, wrapped it around the hat as a hat band, then tied it into a bow. I added a double layered flower with a pink flower gem in the center, just above knot of the bow.


Isn't this Bunny Box the cutest thing? I love how it turned out! 


Thanks for stopping by! I'd love to hear what you think.

Shirley

Sunday, March 4, 2018

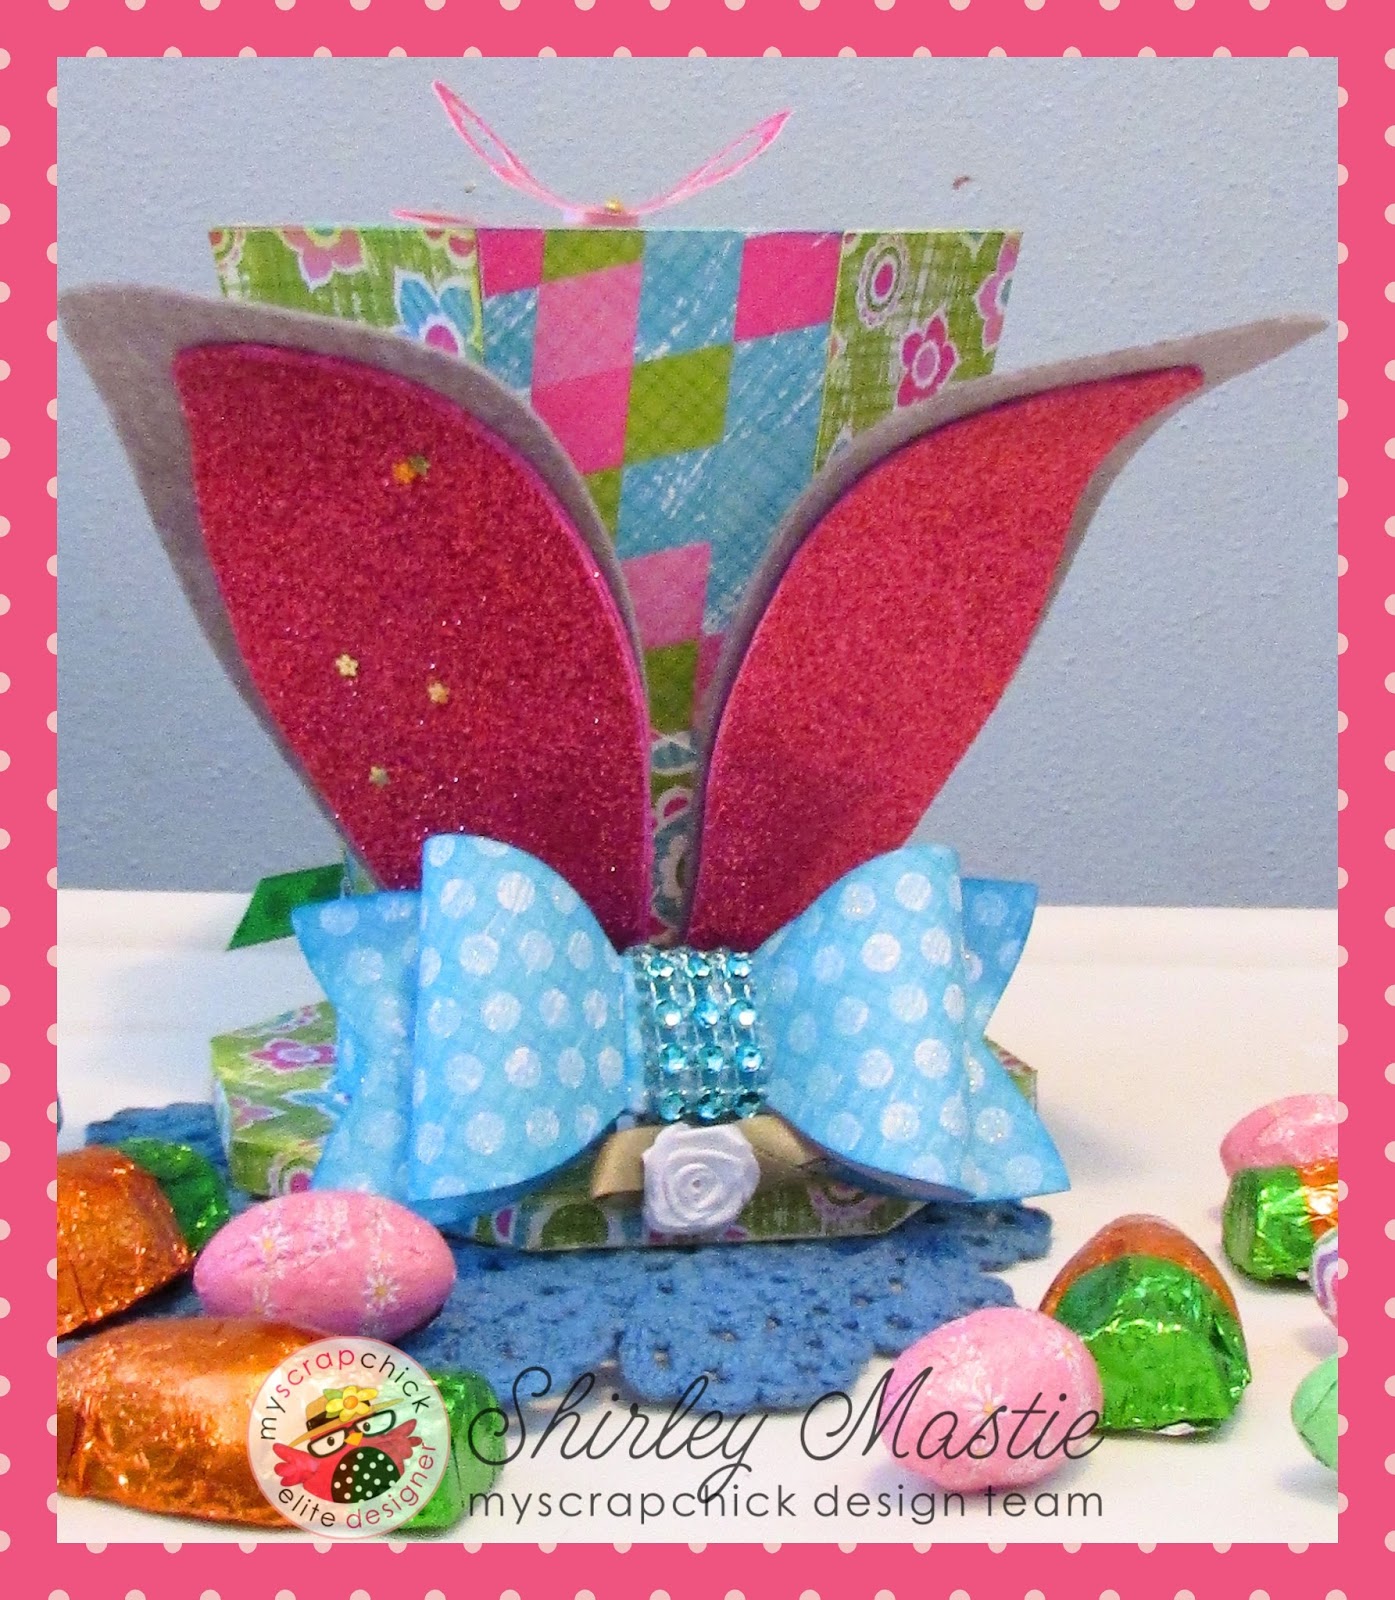
Mad Hatter Bunny Hat


One of my favorite files from My Scrap Chick is  the Uncle Sam Hat Box. I love figuring out new ways to use this versatile file. This time I used it to make a Mad Hatter Bunny Box.


MATERIALS

Uncle Sam Hat Box
Bunny Top Hat Box (for the ears)
Jam Jar and Candle Gift Wrap (for the bow)
 Pixey Stix Glitter Pack by the Paper Studio
Grey felt from The Summer Sky Set by Cricut
Raspberry Confetti Peel & Stick Foam Sheet by Foamies
Paper Flowers by Jots
Butterfly Paper Accents by K & Company
Blue Diamond Wrap by Floral Garden
Small white silk flower
1/4 inch wide green ribbon


I made the hat following the PDF instructions. See how I put the hat together here: https://scrappysamdesigns.blogspot.com/2017/12/frostys-top-hat.html  I cut each of the long strips in half diagonally and alternated gluing them to the top and bottom of each section of the hat starting with the bottom section of a notched section. (See picture below.)


I made 6 inch ears using the Bunny Top Hat Box file. The larger piece was cut from grey Cricut felt and the inner ear was cut from the raspberry confetti foam.  I cut one inch off the bottom then glued the ears to the front of the hat. I cut a 1 inch by 9 inch strip of the blue dot cardstock and wrapped it around the base of the hat gluing it together in the front. I then made a 4 inch bow from the blue dotted cardstock and the bow from Jam Jar and Candle Gift Wrap, and wrapped the center with the blue Diamond Wrap. The finished bow was attached in front of the ears with foam tape and a little white silk flower was attached below the bow.


I made a bow from the ribbon and added the bow and a blue flower to the back with foam tape. A butterfly accent was added to the top of the inner box.


The inner box lifts out. This will make a cute Easter basket for one of my granddaughters.


I love how this little Mad Hatter Bunny Box turned out! What can you make with the Uncle Sam Hat Box?

Thanks for stopping by!

Shirley

Monday, February 19, 2018

Honeycomb Card

Hi! Today I am sharing a little card made with the Honeycomb Bee Card Bundle and Bee Greetings Printable PDF from My Scrap Chick. 


Bee Greetings Printable PDF: click to enlarge                Honeycomb Card Bundle of 6: click to enlarge                            


I also used Relax Barnaby from Digital Delights by Louby Loo.

My card is 5 by 7 inches and was made in Design Space. I used cardstock from the Confetti Stack by DCWV for the card base, white, light yellow and dark brown cardstock by Recollections for the mats. Using Design Space,  I attached the "Relax Barnaby" image to the honeycomb layer of the card. I colored the image with my Prismacolor pencils, then put together the layers of my card. I added small orange flower gems around the oval, and a yellow and brown ribbon bow to the bottom left. I printed the "Bee Greetings," cut out the greeting I wanted, and mounted it on brown, then the printed cardstock. I accented the sentiment with Prismacolor pencils and two flower gems, then mounted it to the top right of the image using foam tape.


Thanks for stopping by. Happy crafting!

Shirley

Tuesday, February 6, 2018

Valentine Fairy Bear Booty Box


Valentines Day will be here before we know it, so it's time to get those projects for our loved ones finished.


I created this adorable booty box using the following files from My Scrap Chick.


Fairy Bear Girl Booty Box 
Triple Hearts Card Set
Be Mine Card Set
I Heart You Card Set
XO Hugs and Kisses Card Set
Rosettes Scallop Edge

FAIRY BOOTY BOX

Materials

pink, red and white  and green glitter cardstock by Colorbok
tan and pink pearlescent cardstock by Recollections
white and black glossy cardstock scraps
pink heart gems and pink round gems
inks in coordinating colors
black and white fine tip pens
adhesive and foam tape

The bear as made from tan pearlescent cardstock and the cheeks, flowers, collar and large wing was made with the pink pearlescent cardstock. The belly, flower, small wing and flower centers were made from pink glitter paper. The flower base was made from green glitter cardstock. All pieces were accented with coordinating inking around the edges. The gems were added to the collar. The finished box is about 6.5 inches tall and wide.

VALENTINE PICKS

Materials

MSC files found hereand here.
Red, pink and white glitter cardstock by Colorbok
Pearlescent pink cardstock by Recollections
Uptown Flair Glitter Stack by the Paper Studio
Pixy Stix and Peanut Butter Hearts by Palmer (I found both at Dollar Tree)
2 inch heart punch
shish kabob skewers
1/4 inch wide pink ribbon
red glitter heart picks (optional)
Double sided tape, glue
paper clips

I made each pick about 2.5 inches wide, then duplicated each one and flipped it horizontally. I then used a combination of double sided tape and glue to attach a Pixy Stix between the two layers, then held them together with paper clips while they dried.


I used the Rosettes Scallop Edge for the heart candy rosettes. I followed the PDF tutorial included with the file and made each one about 3 inches in diameter. ( You will need two strips at 1.5 inches for each rosette.) I used the heart prints from the Uptown Flair Paper Stack for the rosettes. 

I turned the rosette to the back and glued a 6 inch stick into one of the valleys, then glued a 2 inch punched heart over the hole in the center.


I added double sided tape to the stick one inch from each end, then wrapped 1/4 inch pink ribbon around the stick. I then tied a bow around the top below the rosette.


I turned the rosette over to the front.


I added several strips of double sided tape to the back of the candy heart, then attached it to the center of the rosette.


I added some floral foam to the booty box, then poked the picks into the foam. I also added two red glitter picks to the box.


I love how this Valentine Fairybear Booty Box turned out!


I hope you enjoyed my little project. Have a wonderful Valentines Day!

Shirley